
Github Repo: https://github.com/malachicorrigan/DattoCloudContinuity_ImmyBot
Today we’re going to create a software package within ImmyBot for Datto Cloud Continuity. This allows us to deploy Datto Cloud Continuity remotely, in the background, and automatically register the client to the desired customer.
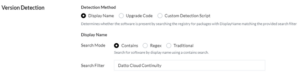
First let’s create a new piece of software within ImmyBot, naming it Datto Cloud Continuity of course. For Version Detection use the search mode ‘Contains’ with the string ‘Datto Cloud Continuity’.
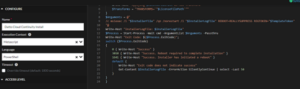
Now we need to create the installation script, click the new button and within the new script window name it Datto Cloud Continuity Install while also setting Datto Cloud Continuity Install to Meta script and Language to PowerShell. Next, we need to paste in the installation script I have created, this can be found at the GitHub repo referenced at the top of the page. Once done, hit create.
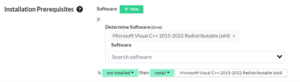
Even though we created the installation script, sometimes it will fail because the installer does not have the desired prerequisites needed to install. We need to add a Microsoft Visual C++ 2015-2022 Redistributable (x64) prerequisite. ImmyBot makes this easy, it should look like this below.
Now we need to add the uninstallation script, I have chosen to use Uninstall MSI by UpgradeCode within ImmyBot. If this is not available to you I have uploaded the relevant section onto the Github repo. Additionally, set the Upgrade Strategy to Uninstall/Install

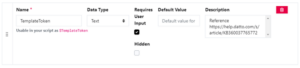
Now we need to create the configuration task, this is where we can add a variable that the technician deploying the software can update from the deployment screen. First you need to add a Parameter called ‘TemplateToken’ that is the Text data type. This should require user input, and leave the default value as blank. Lastly in the description include
‘Reference https://help.datto.com/s/article/KB360037765772’
so that any technician can look at that KB and know where to get the Template Token.
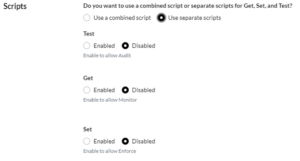
For the script section, this software will not need any further configuration so we will set it to ‘Use separate scripts’ and select Disabled for all of them.
Lastly, we need to add the dynamic version functionality, this means that ImmyBot will always grab the latest version of Cloud Continuity from their website. Check the box to Use dynamic versions and create a new dynamic version script. Insert the code that is located on my GitHub repo and save.

Once all of this is done, hit update and go back on your software. You now can create a deployment for this software. It will look like the screen below

The final part you need is the Template Token, the KB linked is extremely helpful but here is the process. But the process is as follows:
- Go to the Datto Portal https://portal.dattobackup.com/
- Navigate to Status > Cloud Continuity Status
- Click on the client name of the customer you’re wanting to deploy Cloud Continuity for
- Click Create RMM Template

- Once created you will be provided the Token, this will be what is inserted into the Deployment Page.

Once you deploy Cloud Continuity with the desired customer’s token it will install and automatically register the client to the customer’s cloud continuity portal, you should allow up to 5-10 after completion of install. Remember, you also need to have the device restart to have the full functionality of Cloud Continuity, if you’re wanting devices to restart when you deploy cloud continuity you can select the option to force restart within the top right of the deployment screen.